This guide is for a cold wallet masternode setup and while the examples are for Bitcurrency Pro it will be fairly similar for most coins besides the different ports and file names. It assumes some experience with cryptocurrency wallets and a basic knowledge of the Linux command line but is meant to be suitable for a first time masternode owner. For this guide you will use two computers, firstly your local windows machine where you safely store the coins required to run your masternode and secondly a VPS which hosts the actual node but does not hold any actual coins.
The first thing you will need to do is get a local wallet running, for this guide we are going to assume you are using the windows wallet for your cold storage. Download the current wallet as listed on the Bitcointalk thread. Extract the wallet from the archive and run the wallet for the first time. You may get a smartscreen warning and a firewall warning both of which you can allow/run. Once the wallet is launched it should start syncing after a short time. If it does not you will need to edit the config file located at C:\Users\YOURUSERNAME\AppData\Roaming\BitCurrencyPro\BitCurrencyPro.conf. If you have changed the path of your Users folder or anything like that I will assume you know how to find it. The following lines need to be added to the config file.
addnode=52.178.204.101
addnode=89.222.233.222
addnode=104.197.211.56
addnode=45.63.100.217
addnode=94.65.19.160
addnode=45.77.91.38
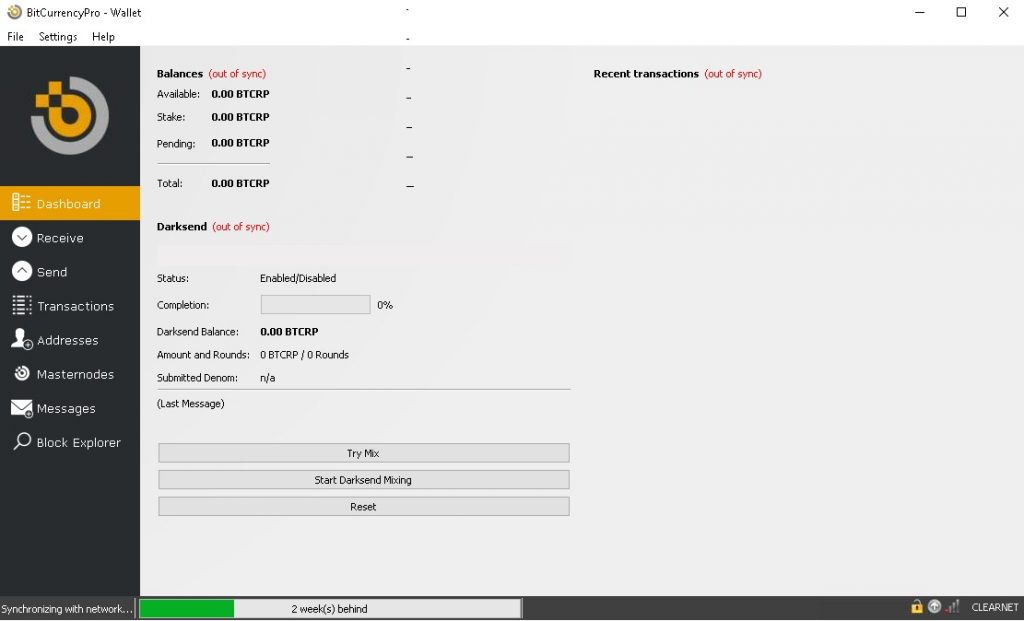
Your wallet should not begin synchronizing with the network as seen in this screenshot.
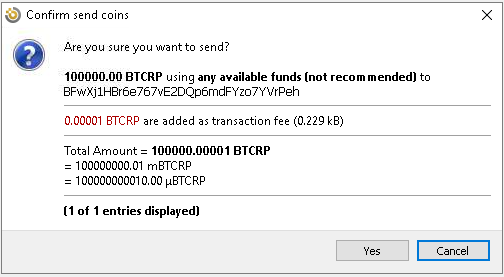
So far not much as been different from a regular wallet setup however we are configuring a hot/cold masternode so we will need to configure an VPS as well and make some configuration changes to the local wallet as well. Once the wallet has synchronized you can receive your first coins on your own address. If you purchase from an exchange etc make sure you send slightly more than the required 100000 coins to make up for exchange and transaction fees. Once the coins have reached your wallet and confirmed you will need to create an address for your masternode. Create an address called something you can remember for later like MN1 as seen in the following screenshot.

Once you have created the address copy the address and send 100000 coins to that address, the BTCRP wallet automatically adds the fee to the transaction so you do not need to do any calculations.
Once completed you will only see the transaction fee appear in the wallet dashboard. We will now be able to get the wallet outputs which will confirm that everything is ready for the masternode. Click help and select debug window from your wallet before selecting the console tab. There are two commands we will run here and I suggest that you copy the result of both to a text file for use later. The first command is “masternode genkey” which will result in a string of characters This is the priv key used at the end of the guide. The second command is “masternode outputs” which will give you a string of characters followed by a number. This is the transaction hash and the output id (split by a space) We will use the strings to configure our node.
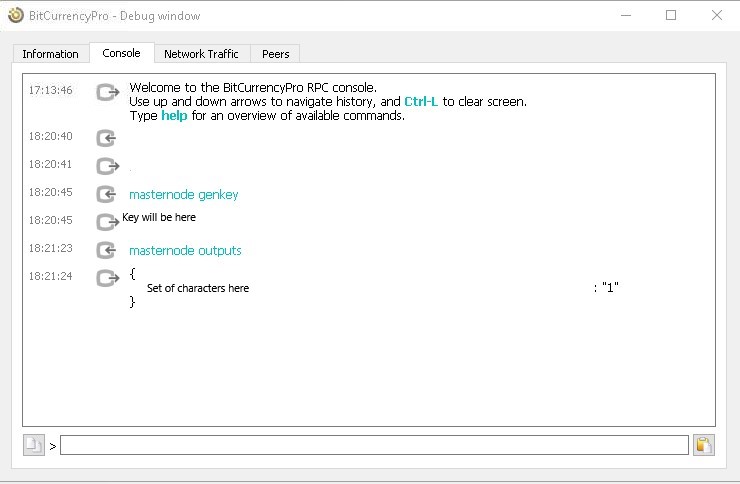
Some detail has been remove from the above screenshot for security. You can still however see what to expect. If the result of the outputs command is blank try restarting the wallet and sending the 100000 coins to yourself again. If you are configuring multiple nodes you will have multiple outputs for each 100000 coins. I do not have enough coins to test if the wallet supports multiple nodes but I imagine it would.
The next thing we will need to do is get our VPS running, you can use a provider of your choice and it is possible to use virtually any Linux server. The key requirement is a static IP address so typically home internet connections would not be suitable. The basics of VPS security are beyond the scope of this guide however I can suggest this guide which is very helpful for beginners. At the very least I suggest following the sections on using keys for SSH, installing Fail2Ban and using UFW. This should be the absolute minimum and will generally protect you from 99% of the typical threats out there most notably brute force bots. I will assume for the rest of this guide that you are able to log into your VPS and that you have secured it. Vultr and Scaleway are popular with masternode owners since they are cheap and reasonable fast/reliable. Ubuntu is the most common server used for masternodes and many guides will reference commands native to it so I suggest that you select Ubuntu if you are not 100% familiar with Linux. I also suggest a VPS with at least 2GB of ram since you will be compiling from source alternatively you may require a swap file.
So you have your VPS up and running and have done some security basics, it is now time to configure the basic development environment required for your masternode. The first thing you should do is create a seperate user to run the masternode as, this is a good habit for security in general.
sudo adduser bitcurrency
Enter a password for the user and proceed through the required details, you do not need to complete anything besides the password. More experienced users are welcome to create a user without a password or the ability to login. I suggest keeping two windows open with KiTTY/PuTTY one with the original user and one with your new user. We are not giving the bitcurrency user permission to execute sudo for safety reasons so you will need to switch back to the user created with your VPS to run sudo commands.
It is time to install the dependencies required for a masternode. Make sure everything is up to date before you begin.
sudo apt-get update
sudo apt-get upgrade
sudo apt-get dist-upgrade
Once everything is up to date we install the basic development environment.
sudo apt-get install libboost-system-dev libboost-filesystem-dev libboost-chrono-dev
libboost-program-options-dev libboost-test-dev libboost-thread-dev libboost-all-dev python-virtualenv git libleveldb-dev g++ libssl-dev autoconf libtool
In addition to the above basic development packages there are some blockchain specific requirements which can be installed with the following commands.
sudo apt-get install software-properties-common
sudo add-apt-repository ppa:bitcoin/bitcoin
sudo apt-get update
sudo apt-get install libdb4.8-dev libdb4.8++-dev
sudo apt-get install libminiupnpc-dev
sudo apt-get install libevent-dev
sudo apt-get install libzmq3-devsudo apt-get install libgmp3-dev
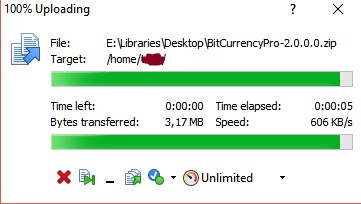
It is now time to download the source, currently the source is available in the bitcointalk thread however it may later be available on github at which point you can git clone it down. For now lets download the zip file and download + install WinSCP. We will use WinSCP to transfer the file from our local machine to the VPS. You can connect to your server with WinSCP with the same credentials you used to connect via Putty/Kitty. This is pretty straight forward but in short you will connect to the server and transfer the zip file to your home directly. I suggest placing it in the home directory of the user we created earlier /home/bitcurrency/ . You will most likely need to upload to the home folder for the user that has SSH access and move the file manually on the VPS e.g mv /home/mainuser/BitCurrencyPro-2.0.0.0.zip /home/bitcurrency/BitCurrencyPro-2.0.0.0.zip
You can now switch the newly created user and switch to that users home directory and verify that the file is waiting for the next step;
mainuser@castor:~$ su bitcurrency
Password:
bitcurrency@castor:/home/mainuser$ cd ~
bitcurrency@castor:~$bitcurrency@castor:~$ ls
BitCurrencyPro-2.0.0.0.zip
bitcurrency@castor:~$
Unzip the file with the following command;
unzip BitCurrencyPro-2.0.0.0.zip
If unzip is not installed you can install it with sudo apt-get install unzip while logged in with your original user. Remember we did not give the bitcurrency user permission to execute sudo. Switch directories to the newly uncompressed source
cd BitCurrencyPro-2.0.0.0
cd src
It is time to compile the daemon by running each of these commands, Fair warning while this is usually painless the current source is fairly fussy. It is shared via ZIP file which loses permissions as well creating some frustration. The most likely cause for a failed compile at this point would be running out of memory if your VPS is to small. This can take quite some time so grab a cup of coffee we are nearly there. The USE_UPNP= directive is optional but it disables the use of UPNP.
make -f makefile.unix USE_UPNP=
If you get a failure on secp256k1 you can correct with the following commands (requires autoconf and libtool)
cd secp256k1
./autogen.sh
./configure –enable-module-recovery
make
cd ..
In the current source you will have a failure while compiling related to the permissions and scripts for the level db folder. To resolve simply run the following commands;
cd leveldb/
chmod +x build_detect_platform
chmod 775 libleveldb.a libmemenv.a
make
cd ..
If running the above fixes still does not work try running ldconfig as root or with sudo. If you get a string of errors about secp256k1 try compiling it with ./configure –enable-module-recovery. If you get an error about libmemenv being missing go back into the leveldb folder and run “make libleveldb.a libmemenv.a” You may also need to run the following “mkdir -p src/obj/zerocoin”
If everything went well you will not have some new files waiting for you which are the executable files for your masternode. Copy the file created to your home folder for ease of use;
mv BitCurrencyProd /home/bitcurrency/BitCurrencyProd
cd ~
You can now run the daemon with ./BitCurrencyProd which will create the initial file structure but exit immediately due to the lack of rpcpassword. This is normal and you need to edit configuration file at this point found at /home/bitcurrency/.BitCurrencyPro/BitCurrencyPro.conf
rpcuser=”set a username here”
rpcpassword=”set a password here”
listen=1
ipv6=0
server=1
irc=0
daemon=1
port=32138
masternode=1
masternodeaddr=”VPS IP”:32138
masternodeprivkey=”the genkey result from earlier in this guide”
addnode=52.178.204.101
addnode=89.222.233.222
addnode=104.197.211.56
addnode=45.63.100.217
addnode=94.65.19.160
addnode=45.77.91.38
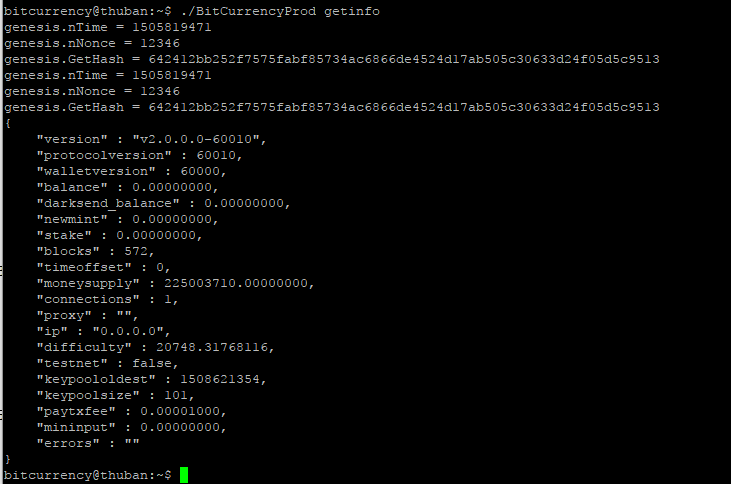
After editing the configuration file you can run the daemon again, it will launch and begin synchronizing. You can check the progress by running ./BitCurrencyProd getinfo , while it downloads the blockchain I suggest adding a cron job to launch the wallet after a reboot. run crontab -e and add a @reboot command;
Cron example below.

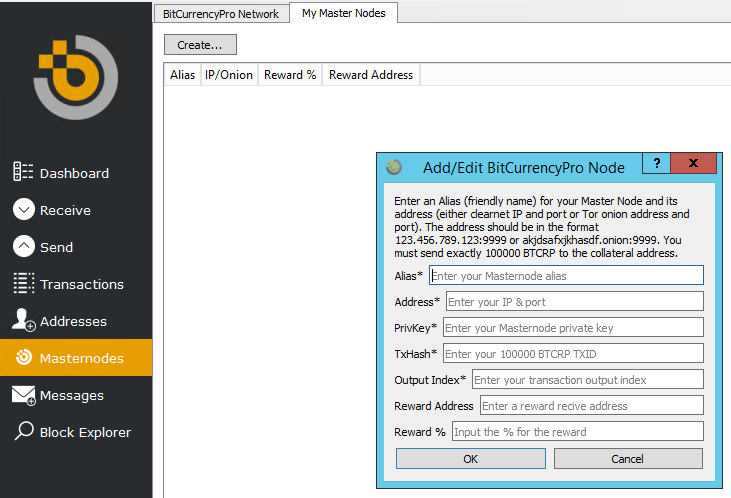
The last step is to create the masternode configuration on your local wallet by filling in all the fields here; (The reward address can be an address you create for the earnings, this can even be in another wallet, set the % to 100)
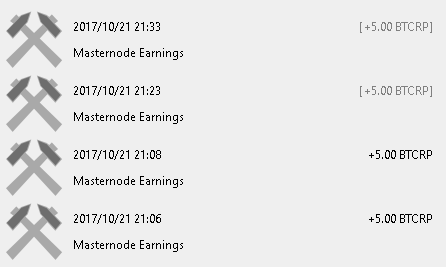
At last, your hard work has paid off and you should be earning rewards shortly. (Remember to go back to your local wallet and start the masternode and don’t forget if you get VN allocation errors you need to unlock your wallet)
You can also use a windows vps if you prefer, the configuration is largely the same except you won’t compiling the wallet. You will edit the configuration files located at C:\Users\”USERNAME”\.AppData\Roaming\ . You may need to allow the Masternode port in the “Advanced” firewall tools which is easy to find by hitting the windows key and typing firewall. I successfully tested both configurations while making this guide.
If you encounter any troubles with masternodes stopping after appearing in the list please check the output of “./BitCurrencyProd masternode status” on your VPS.
If this post was helpful please feel free to donate some BTCRP to me at BQDcE6fjV1NMabc4HKWWhzzW8vy2j3F2Kz